Anti-Entropy Repair in Cassandra
Author: Satish Rakhonde | 11 min read | January 16, 2024
- Hinted Hand-off
- Read-Repair
- Anti-Entropy Repair
The first two mechanisms will be triggered automatically depending on the configuration parameter, which can be either in the cassandra.yaml file (for Hinted Hand-off) or in the table definition (for Read Repair). The last mechanism (Anti-Entropy Repair) requires manual intervention and can be run using the command nodetool repair.
What is Read-Repair?
When the client sends a read request (with consistency level quorum or higher), one of the nodes in the cluster acts as a coordinator. It identifies all the replica nodes and requests a healthiest node for data and other replicas for digest (where replica nodes send the checksum rather than the whole data set so that it can be network efficient).
The coordinator node compares the checksum. If there is any discrepancy, then all nodes (depending on the consistency level) are requested for full data. The coordinator compares the timestamp of the dataset from all nodes to check which has the newest data. It sends an update request to all replicas to have the latest data.
We have a parameter read_repair_chance (value between 0 and 1), which can be configured at the table level. If we are reading data with low consistency, then there won’t be a sufficient level of comparison of data between replicas.
In order to get some benefits of this automatic repair, we can set this parameter to perform read repair for read_repair_chance percent of queries. For example, if we set its value to 0.2, i.e. for 20% of non-quorum queries, read repair will occur automatically but asynchronously. It means this process will occur only after sending data to the client for that read request.
What is Hinted Hand-off?
When a node becomes unresponsive due to overload, network issues, or hardware problems, the failure detector marks the node as down, and the coordinator temporarily stores missed writes if hinted handoff is enabled in the cassandra.yaml file.
The hint is stored in the local system keyspace in the system.hints table. It includes a target ID for the downed node, a hint ID (time UUID) for the data, and a message ID that identifies the Cassandra version. The hints are written to the respective node when it’s back online. If a node is down for longer than max_hint_window_in_ms (default: 3 hours), the coordinator node discards the stored hints.
What is Anti-Entropy Repair?
To achieve data consistency across all nodes, we must manually run nodetool repair or use Opscenter for Anti-Entropy.
Anti-Entropy repair is a costly operation that can strain server resources (CPU, memory, hard drive, and network) in the cluster. It involves Merkle-Tree building and massive data streaming across nodes.
Repair has two phases: building a Merkle tree of the data, and then having replicas compare and stream the differences between their trees as necessary.
Why do we need this third mechanism despite two automatic mechanisms available?
- When a node is down longer than “max_hint_window_in_ms” (default: 3 hours).
- Anti-Entropy repair must be executed before “gc_grace_seconds” (default: 10 days) to prevent tombstone resurrection.
Performance Impact
During the first phase, intensive disk I/O may occur as it performs validation compaction and builds a Merkle tree by hashing every row of all SSTables. This operation is resource-intensive, impacting CPU, memory, and disk I/O.
Additionally, when a Merkletree difference is detected, streaming a large amount of data to remote nodes can overwhelm network bandwidth.
Running Anti-Entropy Repair (Manual Repair)
When to run manual repair?
- Schedule repairs weekly to maintain node health.
- When bringing a node back into the cluster after a failure.
- On nodes containing data that is not read frequently.
- To update data on a node that has been down.
- Run a repair operation at least once on each node within the value of gc_grace_seconds.
- To recover missing data or corrupted SSTables.
There are basically three main sets of options in the nodetool repair command, out of which we need to select options as per your requirement:
- Incremental / Full
- Parallel / Sequential
- With Partitioner Range / Without Partitioner Range
How should we repair?
You should run full repairs weekly to monthly as per data / load on cluster or workload requirements, and run incremental repair daily or when required.
Full/Incremental Repair
In full repair, Cassandra compares all SSTables for that node and makes necessary repairs. The default setting is incremental repair. An incremental repair persists data that has already been repaired, and only builds Merkle trees for unrepaired SSTables.
Sequential/Parallel Repair
For full repair, we need to run the command below on all nodes sequentially or parallel.
nodetool repair -full -pr -seq keyspace -h hostname (for sequential on each node)
nodetool repair -full -pr keyspace -h hostname (for parallel on each node, parallel is default in Cassandra 2.2 and later)
For incremental repair, we need to run the command below on all nodes sequentially or parallel.
We need to migrate the cluster to incremental repair one node at a time.
To migrate one Cassandra node to incremental repair:
- Disable autocompaction on the node.
- Run a full, sequential repair.
- Stop the node.
- Set the repairedAt metadata value to each SSTable that existed before you disabled compaction.
- Restart Cassandra on the node.
- Re-enable autocompaction on the node.
Prerequisites
Listing SSTables
Before we run a full repair on the node, list its SSTables. The existing SSTables may not be changed by the repair process, and the incremental repair process you run later will not process these SSTables unless you set the repairedAt value for each SSTable (see Step 4).
We can find the node’s SSTables in one of the following locations:
- Package installations: /var/lib/cassandra/data
- Tarball installations: install_location/data/data
This directory contains a subdirectory for each keyspace. Each of these subdirectories contains a set of files for each SSTable. The name of the file that contains the SSTable data has the following format:
<version_code>-<generation>-<format>-Data.db
Note: We can mark multiple SSTables as a batch by running sstablerepairedset with a text file of filenames — see Step 4
Migrating the node to incremental repair
- Disable autocompaction on the node:nodetool disableautocompactionNote: Running this command without parameters disables autocompaction for all keyspaces.
- Run the default full, sequential repair:nodetool repair
Running this command without parameters starts a full sequential repair of all SSTables on the node. This may take a substantial amount of time.
- Stop the node.
- Set the repairedAt metadata value to each SSTable that existed before you disabled compaction.Use sstablerepairedset. To mark a single SSTable SSTable-example-Data.db:sudo sstablerepairedset –really-set –is-repaired SSTable-example-Data.db
Note: The value of the repairedAt metadata is the timestamp of the last repair. The sstablerepairedset command applies the current date/time. To check the value of the repairedAt metadata for an SSTable, use:
sstablemetadata example-keyspace-SSTable-example-Data.db | grep “Repaired at”
- Restart the node.
After the completion of migration on all nodes, now we can run incremental repairs:
nodetool repair -seq keyspace -h hostname
OpsCenter Repair Service
The Repair Service is configured to run continuously and perform repair operations across a DataStax Enterprise cluster in a minimally impactful way. The Repair Service runs in the background, constantly repairing small chunks of a cluster to alleviate the pressure and potential performance impact of having to periodically run repair on entire nodes.
When the entire cluster has been repaired, the Repair Service recalculates the list of subranges to repair and starts over. Repairing the entire cluster one time in a cycle.
Note: If a cluster is datacenter-aware and has any keyspaces using SimpleStrategy, the Repair Service will fail to start. It should be NetworkToplogyStrategy.
Incremental Repairs
OpsCenter performs an incremental repair on a user-configured set of tables every time a subrange repair on the mutually exclusive set of other tables is run on a given node. A user-configurable option (incremental_range_repair) controls whether to repair just the subrange or the entire range of the node. The default is to repair the entire range of the node.
Note: If a cluster is multi-data center and there is a keyspace that only exists in one data center, it might be a while between incremental repairs in that data center because the Repairs Service currently repairs an entire data center at a time.
After manually migrating a table to use incremental repair, update the user-configured list of tables in the incremental_repair_tables configuration option. Any incorrectly formatted table logs an error.
Configuration options for incremental repair
To configure the following, add a [repair_service] section to the opscenterd.conf file for all clusters, or to the cluster_name.conf file for individual clusters. Settings in cluster_name.conf take precedence over those in opscenterd.conf.
[repair_service] incremental_repair_tables
The list of keyspaces and tables to include in incremental repairs. (e.g. Keyspace1.Standard1, Keyspace1.Standard2)
[repair_service] incremental_range_repair
Whether incremental repairs should do subrange repair or full repair of a node’s entire range.
[repair_service] incremental_err_alert_threshold
The threshold for errors during incremental repair to ignore before alerting that it may be failing excessively.
Prerequisites
In a multi-data center environment, the NetworkTopologyStrategy is required as the replication strategy for all keyspaces to run the Repair Service. The Repair Service will not run with SimpleStrategy.
Procedure to start repair service
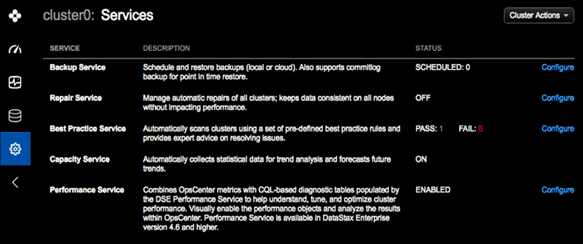
- Open OpsCenter on your web browser. In the left navigation pane, click Services.
- Click Configure for the Repair Service.

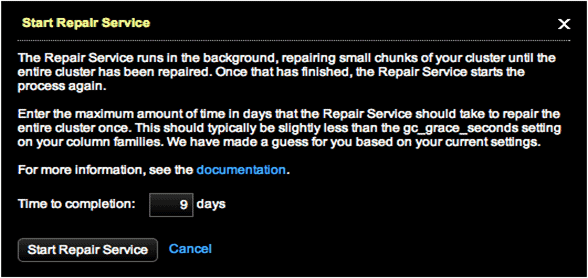
- In the Start Repair Service dialog, enter a value for the Time to completion field. The default is nine days. Typically, we should set the Time to Completion to a value lower than the lowest gc_grace_seconds setting. The default for gc_grace_seconds is 10 days.

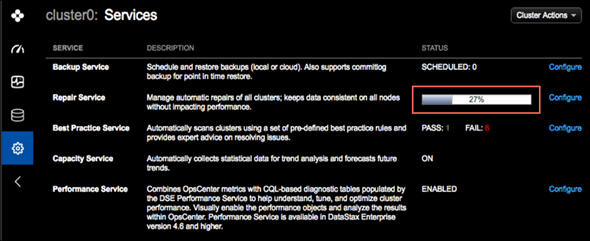
- Click Start Repair Service. The Repair Service starts up and updates its status after one minute and every minute thereafter. A progress bar displays the percentage complete for the currently running repair.

Want to chat more about Cassandra with our expert team? Connect with our NoSQL specialists.
