Building a SQL Server Virtual Lab in Windows: Test the Virtual Lab
Author: JP Chen | 6 min read | July 22, 2020
In this final blog post of the series, we will test the virtual lab by registering all the SQL Server instances and then running a multi-server query to query all SQL Server instances. Then, we will wrap-up the testing by creating a shared folder in DV-SQL01 and then access it in both DV-SQL02 and DV-SQL03.
Registering all the SQL Server instances in DV-SQL01
Like creating an account with a website which stores your user account details so that you won’t have to key them in again the next time, registering a server in SSMS stores the server connection details for future connections so that you don’t need to type them in again.
In this section, we will create a server group and then register all the SQL Servers in the virtual lab.
To register all the SQL Servers in DV-SQL01:
- Logoff the current logged on local administrator user.
- Logon to DV-SQL01 using the DV-SQLNET\JBauer domain user account.
- Open SSMS.
- Type DV-SQL01 in the Server name text box.
- Click Connect.
This will connect you to the DV-SQL01 default instance. - Click the View menu on SSMS.
- Click Registered Servers on the drop-down menu.
- Expand Database Engine.
- Right-click Local Server Groups.
- Click New Server Group… on the drop-down menu.
- Type Virtual Lab SQL Servers in the Group name text box.
- Click OK.
- Right-click the Virtual Lab SQL Servers folder.
- Click New Server Registration… on the drop-down menu.
- Type DV-SQL01 in the Server name text box.
- Click SAVE.
- Repeat steps 13 to 16 to register DV-SQL02 to the Virtual Lab SQL Servers server group.
- Repeat steps 13 to 16 to register DV-SQL03 to the Virtual Lab SQL Servers server group.
As shown in Figure 2-41 Creating a New Server Group and Registering SQL Servers, you will find the three instances of SQL Servers registered under the Virtual Lab SQL Servers server group.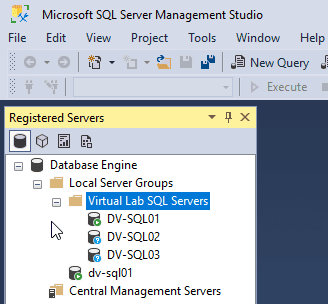
Figure 2-41 Creating a New Server Group and Registering SQL Servers
This completes creating the Virtual Lab SQL Servers server group and registering DV-SQL01, DV-SQL02, and DV-SQL03. Next, we will run a multi-server query to query all the SQL Server instance in the Virtual Lab SQL Servers server group.
Running a Multi-Server Query to Query all SQL Server Instances
If you have a script and you need to run it against multiple SQL Servers, would you rather run it once again all servers or choose to run it one at a time for each of the SQL Servers? Most likely, you would like the former option. Multi-server query allows you to do just that and the results returned by the query can be combined into a single results pane. The results set will include one additional column identifying the server name for each server.
To run a multi-server query to query all the instances in the Virtual Lab SQL Servers server group:
- Right-click on the Virtual Lab SQL Servers server group.
- Click New Query on the pop-up menu.
Notice the SSMS status bar turns into pink color indicating that it is a multi-server query. - Run the following Querying the Server Properties.sql script to query the server properties for all the registered SQL Servers in the Virtual Lab SQL Servers server group:
01  -- Querying the Server Properties

02  SELECT

03  SERVERPROPERTY('ServerName') AS [Instance Name],

04  SERVERPROPERTY('ProductVersion') AS [Version Build],

05  SERVERPROPERTY ('Edition') AS [Edition],

06  SERVERPROPERTY('ProductLevel') AS [Service Pack],

07  CASE SERVERPROPERTY('IsIntegratedSecurityOnly')

08      WHEN 0 THEN 'SQL Server and Windows Authentication mode'

09      WHEN 1 THEN 'Windows Authentication mode'

10  END AS [Server Authentication],

11  CASE SERVERPROPERTY('IsClustered')

12      WHEN 0 THEN 'False'

13      WHEN 1 THEN 'True'

14  END AS [Is Clustered?],

15  [cpu_count] AS [CPUs],

16  [physical_memory_kb]/1024 AS [RAM (MB)]

17     FROM [sys].[dm_os_sys_info]
Script 2-4 Querying the Server Properties
- Notice the output of Figure 2-42 Output of the Multi-Server Query shows all the server properties for the three SQL Server instances registered in the Virtual Lab SQL Servers server group:

Figure 2-42 Output of the Multi-Server Query
Creating a Share Folder and Accessing It from All Servers
Creating a share folder allows you to share and transfer files between servers. In this section, we will create a folder in DV-SQL01 and then test accessing it in DV-SQL02 and DV-SQL03.
Note: In a Production environment, as part of the change control process, you will need to make a service request for the Windows Administrators to create the share folder and grant the permissions to the specific user accounts.
To create a folder and share it in DV-SQL01 then test accessing in DV-SQL02 and DV-SQL03:
- Logon to DV-SQL01 as JBauer.
- Press Win+E on your keyboard.
- Click This PC on the left pane.
- Click Local Disk C:\.
- Create a folder and name it 24×7.
- Right-click on the 24×7 folder.
- Click Properties on the pop-up menu.
- Click the Sharing tab as shown in Figure 2-43 Sharing a Folder.
- Click Share…
You can add the domain users or groups you wish to grant access to this folder and the permission level. - Click Share.
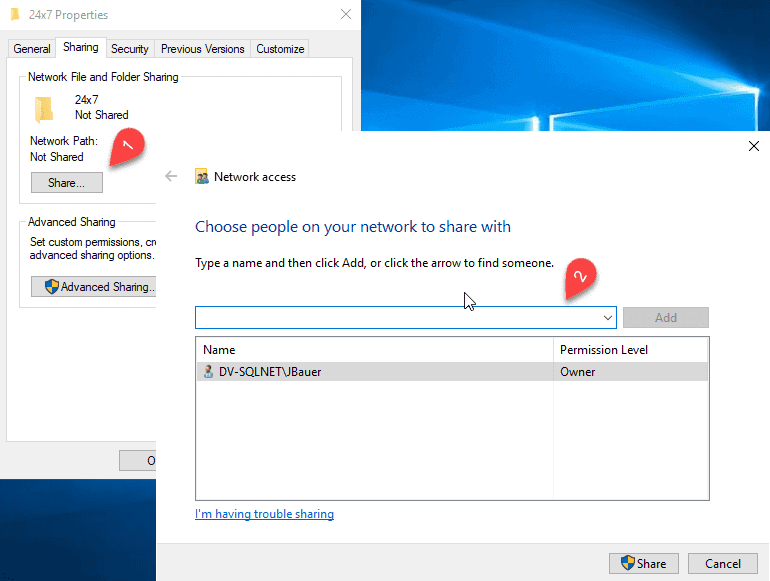
Figure 2-43 Sharing a Folder - Type Administrator in the User name text box.
- Press Tab on your keyboard.
- Type Password$ in the Password text box.
- Press Enter on your keyboard.
You will see the Network access message box notifying you that the folder \\DV-SQL01\24×7 is shared. - Click Done.
- Click Close.
- Logon to DV-SQL02 with the JBauer domain user.
- Press Win+R on your keyboard.
- Type \\dv-sql01\24×7 in the Open text box.
- Press Enter on your keyboard.
- Create a text file and name it DV-SQL02.
You can create this file because you are logged on as JBauer and you have Owner permission. - Logon to DV-SQL03 with the JBauer domain user.
- Press Win+R on your keyboard.
- Type \\dv-sql01\24×7 in the Open text box.
- Create a text file and name it DV-SQL03.
- Go back to DV-SQL01.
- Open the 24×7 As shown in Figure 2-44 Checking the 24×7 Folder, you will notice the text files created in DV-SQL02 and DV-SQL03.
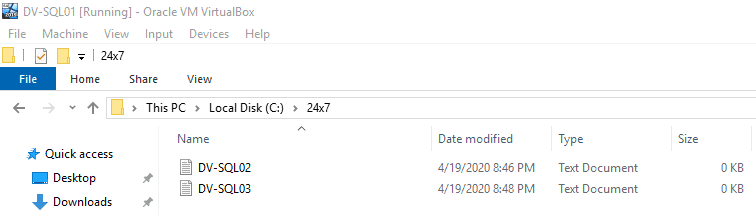
Figure 2-44 Checking the 24×7 Folder
This completes the testing of the virtual lab.
You have now completed setting up the virtual lab for SQL Server 2019 HADR testing. You can repeat these steps in later days when you need to re-create the virtual lab for further testing. Thanks for tuning in for my blog series. You can find all of the blog posts below if you missed anything.
If you’re looking for SQL Server support, please reach out.
Virtual Network for the Virtual Lab
Software & Hardware Requirements
Installing Oracle VM VirtualBox and Creating a Virtual Network
Creating the Domain Controller (DC) VM