Getting High Availability for IBM Db2 on AWS with Db2 Pacemaker Using Overlay IP – Part 2
Author: Scott Konash | 9 min read | April 27, 2023
How to Set Up IBM Db2 Pacemaker on AWS Using Overlay IP
High Level Architecture
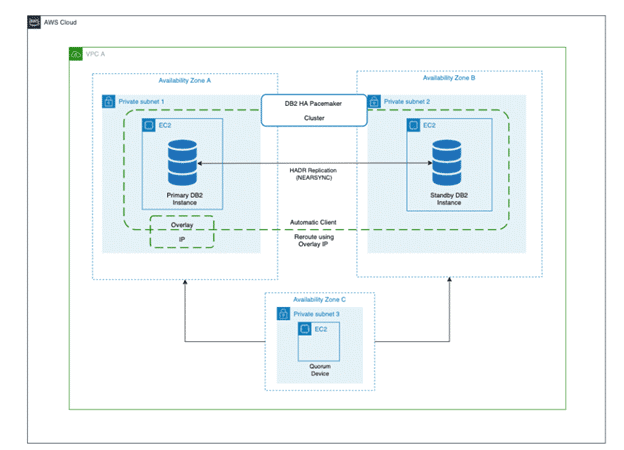
Your system must meet the following prerequisites to set up IBM Db2 Pacemaker on a two-node HADR cluster:
Set up instance user ID and group ID.


Set up host names for all the hosts in the /etc/hosts file on all the hosts in the cluster.


Install kornshell (ksh) on both hosts.
yum install ksh -y
Install python3-dnf-plugin-versionlock package on both hosts.
yum install python3-dnf-plugin-versionlock -y
Confirm that your instances have TCP/IP connectivity between the ethernet network interfaces.
Enable password less secure shell (ssh) for the root and instance user IDs across both instances. Once this is , verify it using the ssh <host name> -l root ls
command (The hostname can be an alias or a fully qualified domain name.).


Verify that you have all the required resources created on both of the servers.
ls -alL /usr/lib/ocf/resource.d/heartbeat/db2*


Activate HADR for the Db2 database cluster.
db2pd -d testdb -hadr | egrep "HADR_ROLE|HADR_SYNCMODE|HADR_STATE|PRIMARY_MEMBER_HOST|PRIMARY_INSTANCE|HADR_CONNECT_STATUS"

Note: I have already created a Database TESTDB and setup hadr between primary host db2test1 and db2test2.
How to Configure IBM Db2 Pacemaker
After you install IBM Db2 Pacemaker on the primary and standby hosts, run these configuration commands from only ONE of the hosts as a root user.
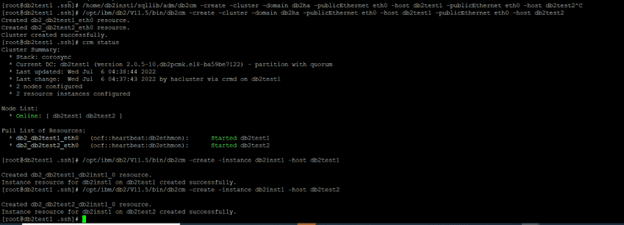
Create the cluster using the db2cm utility. Create the Pacemaker cluster using the db2cm utility with this command. Before running it, replace the -domain and -host values as necessary.
[root@db2test1 .ssh]# /opt/ibm/db2/V11.5/bin/db2cm -create -cluster -domain db2ha -publicEthernet eth0 -host db2test1 -publicEthernet eth0 -host db2test2

Created db2_db2test1_eth0 resource.

Created db2_db2test2_eth0 resource.

Cluster created successfully.

[root@db2test1 .ssh]#
Create an instance resource model using the following commands. Modify -instance and -host parameter values as needed before running.
/opt/ibm/db2/V11.5/bin/db2cm -create -instance db2inst1 -host db2test1

/opt/ibm/db2/V11.5/bin/db2cm -create -instance db2inst1 -host db2test2
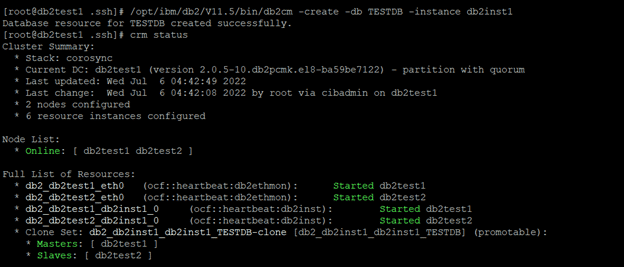
Create the database instance using the db2cm utility. Modify the -db parameter value as needed.
/opt/ibm/db2/V11.5/bin/db2cm -create -db TESTDB -instance db2inst1
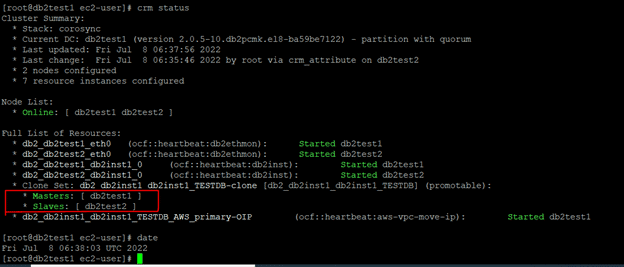
Once you have configured Pacemaker, run the crm status command from both the primary and standby hosts to check if Pacemaker has automated failover activated.
How to Set Up Overlay IP as Virtual IP
When you’re working with HADR activated databases, a virtual IP acts as a common connection point for the clients. In the event of failovers, you don’t need to update the connection strings with the hosts’ actual IP address. The clients are also able to establish the connection to the new primary instance.
The overlay IP address routing on AWS sends the network traffic to HADR database servers within Amazon Virtual Private Cloud (VPC). It uses a route table to make it possible for the clients to connect to the database using the overlay IP from the same VPC, and any Availability Zone, where that database exists.
AWS offers the aws-vpc-move-ip resource agent along with the Pacemaker software, which helps with updating the VPC’s route table.
Please note: You will need additional setup using AWS Transit Gateway or Network Load Balancer if you are trying to connect to the database using overlay IP from on-premises or a different VPC than the one the database servers are on.
Prerequisites for Setting Up Overlay IP as Virtual IP
Select the overlay IP address range that you need to configure. The IP you select should not be used anywhere in the VPC or on-premises. It needs to be part of the private IP address range defined in RFC 1918. For example, if you configure the VPC in the range of 0.0.0.0/8 or 172.16.0.0/12, you are able to use the overlay IP from this range: 192.168.0.0/16. Use these IP and ethernet settings.
192.168.1.81/32

eth0
Disable source and target destination checks on your primary and standby EC2 instances to be able to route traffic through the overlay IP.
aws ec2 modify-instance-attribute –profile <AWS CLI profile> –instance-id EC2-instance-id –no-source-dest-check
Please note: You need to create an AWS profile on both hosts by providing Accesskeyid and secret key.
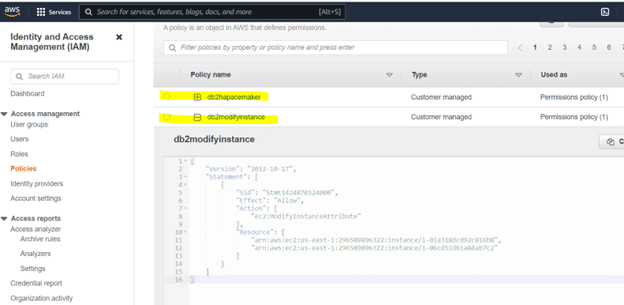
Before you run disable source and target hosts destination checks, you need to create a policy and attach it to the EC2 instances, so you can modify them.
296589896322 – replace with your account id i-01a318dcd92c816b8 – replace with your ec2 instance id(primary) and i-06cd51d61a04ab7c2 – replace with your ec2 instance(standby).
{
"Version": "2012-10-17",
"Statement": [
{
"Sid": "Stmt1424870324000",
"Effect": "Allow",
"Action": ["ec2:ModifyInstanceAttribute"],
"Resource": [
"arn:aws:ec2:us-east-1:296589896322:instance/i-01a318dcd92c816b8",
"arn:aws:ec2:us-east-1:296589896322:instance/i-06cd51d61a04ab7c2"
]
}
]
}
{

"Version": "2012-10-17",

"Statement": [

{

"Sid": "Stmt1424870324000",

"Effect": "Allow",

"Action": [

"ec2:DescribeInstances",

"ec2:DescribeInstanceAttribute",

"ec2:DescribeTags"

],

"Resource": "*"

},

{

"Sid": "Stmt1424860166260",

"Action": [

"ec2:CreateRoute",

"ec2:DeleteRoute",

"ec2:DescribeRouteTables",

"ec2:ReplaceRoute"

],

"Effect": "Allow",

"Resource": "arn:aws:ec2:us-east-1:296589896322:route-table/rtb-059e4b845d234d5cc"

}

]

}
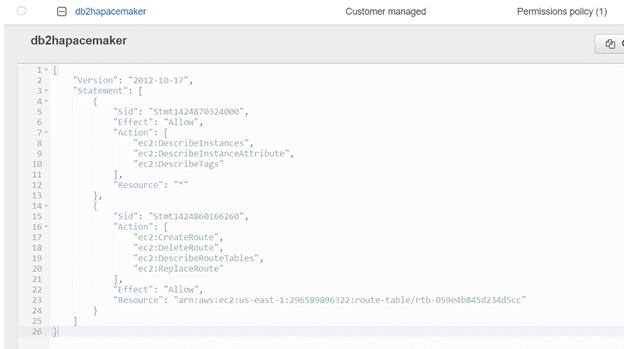
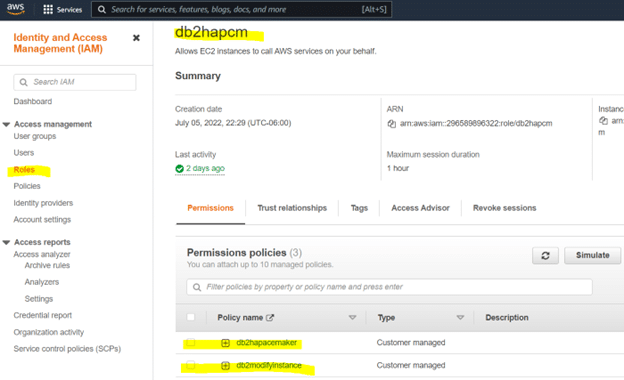
Create a role and attach the policy to this role with the following:
Go to your EC2 instances and attach the role to the EC2 instances.
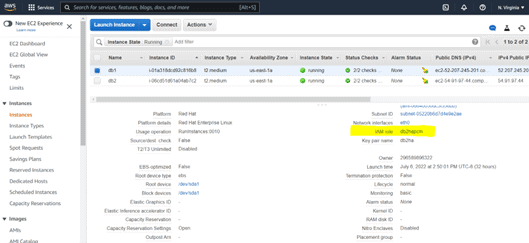
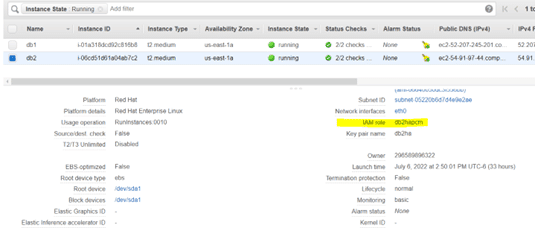
After you make the above IAM changes, run the command below to disable destination check.
aws ec2 modify-instance-attribute –profile awsprofile –instance-id EC2-instance-id –no-source-dest-check
on db2test1
aws ec2 modify-instance-attribute --profile awsprofile --instance-id i-01a318dcd92c816b8 --no-source-dest-check
on host2
aws ec2 modify-instance-attribute --profile awsprofile --instance-id i-06cd51d61a04ab7c2 --no-source-dest-check

Add the overlay IP on the primary instance.
ip address add 192.168.1.81/32 dev eth0
Update the route table with the overlay IP specifying the node with the Db2 primary instance. The following command returns True.
aws ec2 create-route –route-table-id <routetableid> –destination-cidr-block 192.168.1.81/32 –instance-id <primrydb2instanceid>
/usr/local/bin/aws ec2 create-route –route-table-id "rtb-059e4b845d234d5cc" –destination-cidr-block 192.168.1.81/32 –instance-id i-01a318dcd92c816b8
[root@db2test1 .ssh]# /usr/local/bin/aws ec2 create-route --route-table-id rtb-059e4b845d234d5cc --destination-cidr-block 192.168.1.81/32 --instance-id i-01a318dcd92c816b8
{
"Return": true
}
[root@db2test1 .ssh]#

Create a file called overlayip.txt with the following command to create the overlay IP’s resource manager.
primitive db2_db2inst1_db2inst1_TESTDB_AWS_primary-OIP ocf:heartbeat:aws-vpc-move-ip \

params ip=192.168.1.81 routing_table=rtb-059e4b845d234d5cc interface=eth0 \

op start interval=0 timeout=180s \

op stop interval=0 timeout=180s \

op monitor interval=30s timeout=60s
colocation db2_db2inst1_db2inst1_TESTDB_AWS_primary-colocation inf: db2_db2inst1_db2inst1_TESTDB_AWS_primary-OIP:Started db2_db2inst1_db2inst1_TESTDB-clone
order order-rule-db2_db2inst1_db2inst1_TESTDB-then-primary-oip Mandatory: db2_db2inst1_db2inst1_TESTDB-clone db2_db2inst1_db2inst1_TESTDB_AWS_primary-OIP
location prefer-node1_db2_db2inst1_db2inst1_TESTDB_AWS_primary-OIP db2_db2inst1_db2inst1_TESTDB_AWS_primary-OIP 100: db2test1
location prefer-node2_db2_db2inst1_db2inst1_TESTDB_AWS_primary-OIP db2_db2inst1_db2inst1_TESTDB_AWS_primary-OIP 100: db2test2
You must replace the following parameters in the resource manager create command in this file.
- Name of the database resource agent (This can be found through crm config show | grep primitive | grep DBNAME command. For this example, we will use: db2_db2inst1_db2inst1_TESTDB)
- Overlay IP address (created earlier)
- Routing table ID (used earlier)
- AWS command-line interface (CLI) profile name
- Primary and standby host names
Run the below command to create the overlay IP resource manager.
crm configure load update overlayip.txt
Run the following command to manage and start the resource.
crm resource manage db2_db2inst1_db2inst1_TESTDB_AWS_primary-OIP
Verify the status by crm status command.
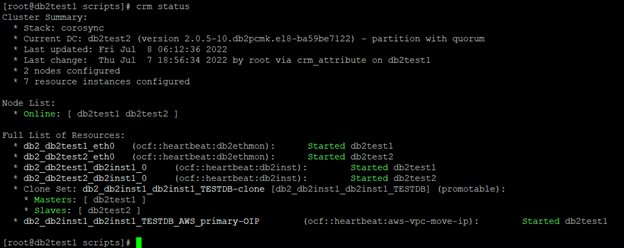
Failover Testing
Verify on the db level if the takeover is working.
Takeover command on standby and verify the status of cluster.


Now, db2host2 is the primary and db2test2 is the master node. Reboot db2test2 node as unplanned and see if the db2 is able to failover automatically.
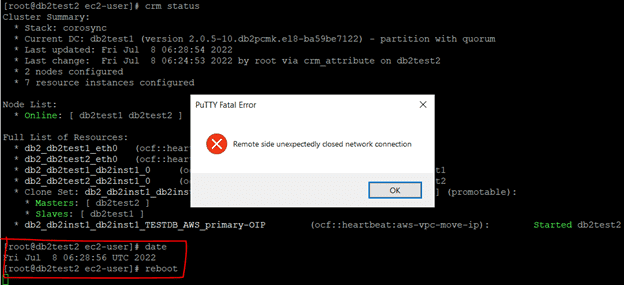
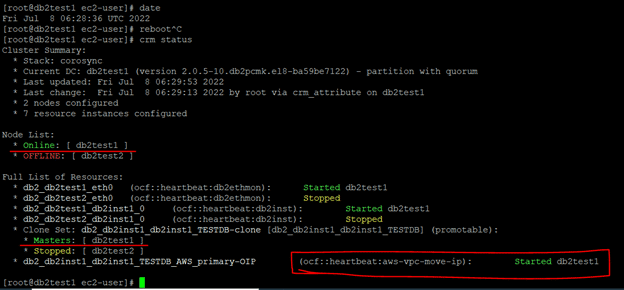
Once the db2test2 is up and running, db2 will come up automatically and the nodes will be online. The cluster setup will also be normal. Meanwhile, client/applications can still connect using overlay IP and the SVCE port.
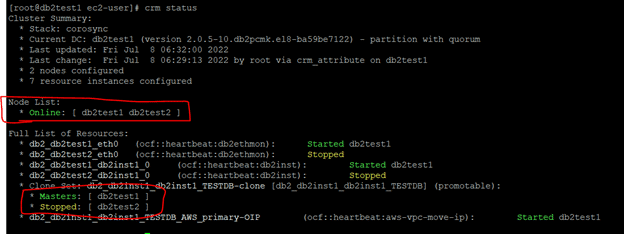
Setting Up a Quorum Device
We will also create a third lightweight EC2 instance to act as a quorum device (QDevice). This helps to avoid a possible split-brain scenario by acting as a tie breaker. The only thing you need for this is the corsync-qnetd* package from the Db2 Pacemaker cluster software.
Prerequisites for Creating a Quorum Device
- Update /etc/hosts file on the Db2 primary and standby instances to include the host details of the QDevice EC2 instance.
- Set up password less root ssh access between the Db2 instances and the QDevice instance.
- Confirm TCP/IP connectivity between the Db2 instances and the QDevice instance on port 5403.
Verify that qdevice rpm is installed on the primary and standby server.
On Primary
[root@db2test1 x86_64]# rpm -qa | grep corosync-qdevice

corosync-qdevice-3.0.0-4.db2pcmk.el8.x86_64

corosync-qdevice-debugsource-3.0.0-4.db2pcmk.el8.x86_64

corosync-qdevice-debuginfo-3.0.0-4.db2pcmk.el8.x86_64

[root@db2test1 x86_64]#
On Standby
[root@db2test2 ec2-user]# rpm -qa | grep corosync-qdevice

corosync-qdevice-debuginfo-3.0.0-4.db2pcmk.el8.x86_64

corosync-qdevice-3.0.0-4.db2pcmk.el8.x86_64

corosync-qdevice-debugsource-3.0.0-4.db2pcmk.el8.x86_64
Install corosync-qnetd* package on the quorum host:

[root@db2test1 x86_64]# /opt/ibm/db2/V11.5/bin/db2cm -create -qdevice quorum

Successfully configured qdevice on nodes db2test1 and db2test2

Attempting to start qdevice on quorum

Quorum device quorum added successfully.

[root@db2test1 x86_64]#
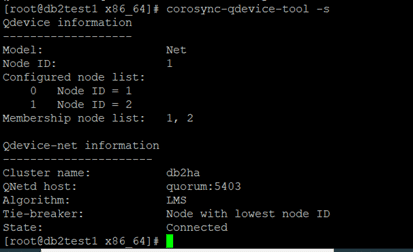
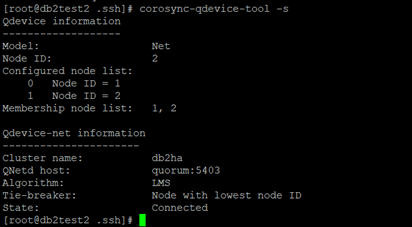
corosync-qdevice-tool -s
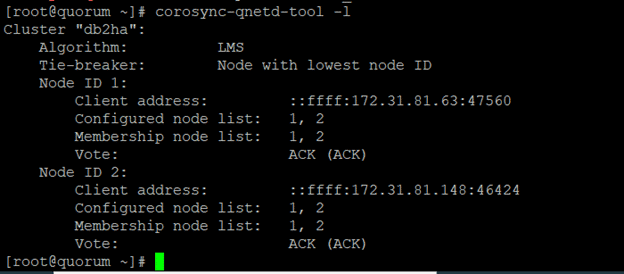
corosync-qnetd-tool -l
Have questions about IBM Db2 HADR, Db2 cloud deployment, Pacemaker, or more? Connect with our IBM Db2 experts today.
