How Oracle DBAs Can Use AWS DMS for Data Migration
Author: Ozwen Coelho | 7 min read | June 19, 2024
AWS Database Migration Service (DMS) is a popular tool for migrating databases and Extract, Transform, Load (ETL) processing. It plays a very crucial role for Change Data Capture (CDC).
It’s important for DBAs to understand the lifecycle process of AWS DMS and performing the necessary changes in Oracle Database.
Let’s learn how to capture data from Oracle Database using DMS and then push it to an AWS Simple Storage Service (S3) bucket.
Preparing Oracle Database for the AWS DMS Service
The database must be in archive log mode. DMS uses Log Miner to read information from the archive logs so that AWS DMS can capture changes.
Enable supplement logging at the database level and alter the database to add supplemental log data.
Enable identification key supplement log data and alter the database to add supplemental log data (primary key) columns.
Enable supplement logging at the table level.
alter table table_name add supplemental log data (PRIMARY KEY) columns;
If the primary key is not there on the table, then there are two options:
- Add supplemental logging to all columns involved in the first unique index on the table (sorted by index name) || ALTER TABLE table_name ADD SUPPLEMENTAL LOG GROUP example_log_group (State,Country) ALWAYS;.
- Add supplemental logging to all columns of table || alter table table_name add supplemental log data (ALL) columns.
It’s advisable to configure a separate database account that will be responsible for connecting to the database from AWS DMS with the below privileges.
CREATE SESSION
SELECT ANY TRANSACTION
SELECT on V_$ARCHIVED_LOG
SELECT on V_$LOG
SELECT on V_$LOGFILE
SELECT on V_$DATABASE
SELECT on V_$THREAD
SELECT on V_$PARAMETER
SELECT on V_$NLS_PARAMETERS
SELECT on V_$TIMEZONE_NAMES
SELECT on V_$TRANSACTION
SELECT on ALL_INDEXES
SELECT on ALL_OBJECTS
SELECT on ALL_TABLES
SELECT on ALL_USERS
SELECT on ALL_CATALOG
SELECT on ALL_CONSTRAINTS
SELECT on ALL_CONS_COLUMNS
SELECT on ALL_TAB_COLS
SELECT on ALL_IND_COLUMNS
SELECT on ALL_LOG_GROUPS
SELECT on SYS.DBA_REGISTRY
SELECT on SYS.OBJ$
SELECT on DBA_TABLESPACES
SELECT on ALL_TAB_PARTITIONS
SELECT on ALL_ENCRYPTED_COLUMNS
Special privilege to capture and apply changes (CDC)
EXECUTE on DBMS_LOGMNR
SELECT on V_$LOGMNR_LOGS
SELECT on V_$LOGMNR_CONTENTS
Configuring a Replication Instance
Login to the AWS console (appropriate permissions to access AWS DMS is required) and search for AWS DMS service.
Click on replication instance and then create the replication instance. The proper Instance class/VPC/Multi-AZ/Storage should be used as per the expected workload.
Configure Source Endpoint
This is the point that the data is extracted from. In this case, it’s Oracle database.
Login to the AWS console (appropriate permissions to access AWS DMS is required) and search for AWS DMS service.
Click on endpoints and then select create endpoint.
Endpoint type : Source
Endpoint Identifier : Enter an identifier for Oracle endpoint. The identifier for endpoint must be unique within an AWS Region.
Source Engine : oracle
Server name : Oracle Host Name/Ip address
Port : port on which database is listening for connections
Username :
Password :
Create S3 Bucket
Login to the AWS console (appropriate permissions to access AWS DMS is required) and search for AWS S3.
Create Bucket
Create an IAM policy
Login to the AWS console and search for Policies.
Click on Create policy, and then choose JSON.
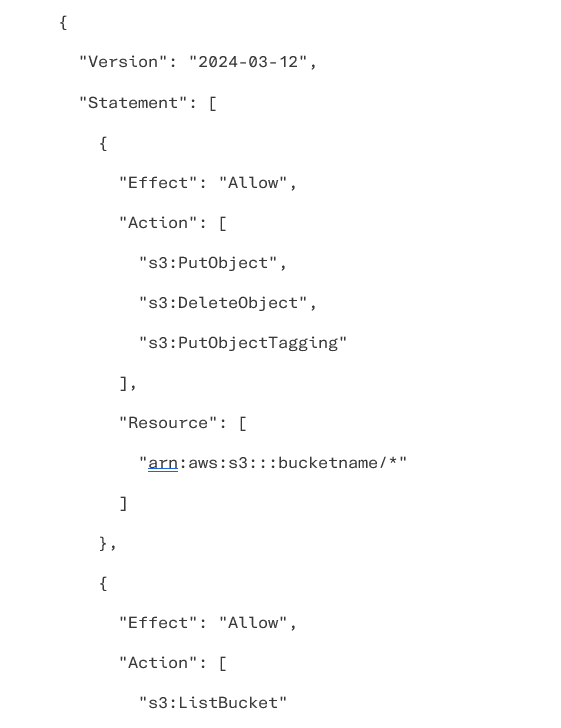
Add an IAM policy like the below example (Modify the bucket name):


Click on Review policy, specify Name and Description, and then choose Create policy.
Create a Role
Login to the AWS console and search for Roles.
Click Create role, select DMS, and then choose Next: Permissions.
In the Create role pane, in the Search field, choose the policy that you created, and then choose Next: tags.
Click Next: Review.
Enter a Role name and a Role description.
Click Create role. Note the Role ARN.
Configure Target Endpoint
The target endpoint is the point to where data will be written. In our case its an AWS S3 bucket.
Login to the AWS console (appropriate permissions to access AWS DMS is required) and search for Aws DMS service.
Click on endpoints and then select create endpoint.
Endpoint type: Target
Endpoint Identifier: Enter an identifier for S3 endpoint. The identifier for endpoint must be unique within an AWS Region.
Target Engine: Amazon S3
Role ARN: Service Access Role ARN used for DMS task.
Bucket name:
Bucket Folder:
Configure the Data Migration Task
Login to the AWS console (appropriate permissions to access AWS DMS is required) and search for AWS DMS service.
Click on DMS migration task and then create task.
Task name: Descriptive name
Task description: Description for the task
Source endpoint: Oracle Source endpoint name.
Target endpoint: S3 target endpoint name
Replication instance: Select the replication instance created.
Migration type: Migrate existing data and replicate ongoing changes.
Target table preparation mode: Do nothing
Enable logging: Default logging.
Start task on create: Start task immediately.
Table Mapping: Mention table name (use JSON format for multiple tables with transformation rule i.e., adding additional columns)
Migrating your Oracle database to an AWS S3 bucket via AWS DMS requires careful steps, from setting up supplemental logging and configuring database account privileges to creating source and target endpoints, and finally, executing the migration task. It’s crucial to ensure all configurations, including replication instances, IAM policies, roles, and endpoint settings are done correctly for a smooth migration. By following the outlined process, organizations can efficiently and securely move their database to the cloud with AWS DMS, taking advantage of AWS’s scalability, flexibility, and cost-efficiency.
Talk to our Oracle database and AWS experts about your database migration needs.
