Upgrading Oracle a Smooth Transition From 2010 to 2024
Author: Zane Warton | 13 min read | October 2, 2024
Upgrading your Oracle database from version 11.2.0.2 to the latest 23ai release can finally bring your database into compliance with most organizations typical patching and modernization requirements. As a bonus the upgrade will significantly enhance your performance, security, and functionality.
This guide will walk you through setting up a new Oracle Enterprise Linux (OEL) 8.7 to support 11g, 19c, and 23ai database software.
It will walk you briefly through the upgrade process. We will also highlight some noteworthy features and benefits of 23ai.
Features and Benefits of Upgrading to Oracle 23ai
- Enhanced Performance: Optimized for speed and efficiency, reducing latency and improving overall system responsiveness.
- Advanced AI Capabilities: Leverages machine learning for AI-driven insights, predictive analytics, intelligent data analysis, and Oracle AI Vector Search, allowing AI algorithms to run directly in the database.
- Real-Time Analytics: Offers real-time data processing, enabling immediate monitoring and response to changes in your environment.
- Improved Security: Provides robust security with advanced encryption, secure data storage, multi-factor authentication, real-time threat detection, and secure AI algorithm processing.
- Expanded Compatibility: Supports a broader range of platforms and integrates seamlessly with other modern tools and technologies, including enhanced Java support.
- User-Friendly Interface: Features a redesigned, intuitive interface with customizable dashboards for a tailored user experience.
- Shrink Tablespace: Reduces costs and optimizes storage by reclaiming unused space in the database.
- Transparent Application Continuity: Ensures zero downtime for database clients by shielding applications from underlying outages.
- Automatic Transaction Rollback: Prevents long-running transactions from blocking high-priority ones.
- Fast Ingest Enhancements: Improves support for Memoptimized Rowstore Fast Ingest, including partitioning, compressed tables, and direct in-memory column store population.
- Raft-based Replication: Achieves fast failover with zero data loss in globally distributed databases.
- Real-Time SQL Plan Management: Quickly detects and repairs SQL performance problems caused by execution plan changes.
- SQL Analysis Report: Assists developers in writing better SQL statements.
- True Cache: An in-memory, automatically managed cache for Oracle Database, designed for performance and scalability.
Oracle 11.2.0.2. Migration to Oracle 23ai Method
One method to upgrade directly from any 10g, 11g, or 12c database would be to use datapump (exp/expdp) to create a logical export of the source data and import it directly into an Oracle 23ai database. This process has significant disadvantages with particularly large or busy databases, so we will be using a RMAN backup and upgrading to 23ai by using the traditional 11g script and the autoupgrade utility for the 19c and 23ai processes. Upgrading to Oracle 23ai requires a 19c/21c database source and upgrading to 19c requires a version such as 11.2.0.4, 12.1.0.2, 12.2.0.1, or 18.
Overview of the 11.2.0.2 migration to 23ai steps
- Setup a new linux server.
- Install 11.2.0.4.
- Restore database from an RMAN backup.
- Upgrade the database to 11.2.0.4 from 11.2.0.2.
- Install 19c, then patch 19c.
- Upgrade from 11g to 19c using autoupgrade.
- Install 23ai.
- Create a 23ai Container database (CDB).
- Migrate and upgrade 19c into that CDB as a PDB database.
Oracle 23ai Upgrade Assumptions
- You have an RMAN backup of your 11.2.0.2 database that includes the control file and spfile.
- We will be setting up a new server, using Oracle Enterprise Linux 8.7.
- We will be using Oracle’s Virtual Box to host the new server image, but you can extrapolate this to a compute instance on VMware, AWS, OCI, or Azure.
- For more details in depth please review the 11g/19c/23ai documentation and install guides.
OEL 8.7 Server Setup and Configuration
As part of the upgrade process, and to perform this demo, we will set up a new Oracle Enterprise Linux (OEL) 8.7 server using Oracle’s Virtual Box.
Download installation media
- Download the OEL 8.7 ISO image from Oracle’s software delivery cloud.
- You can also download 23ai, 19c, and 11.2.04 database install files from this location.
Setup Virtual Box Instance
- Create a new server and name it (ol8 for me). The type is: Linux, Version: Oracle Linux 64-bit.
- Select the ISO you just downloaded to boot with.
- 10 gb memory, 4 vcpu.
- 300 gb virtual hard disk, not pre-allocated.
- I use a bridged network connection so I can connect to it with putty.

Install OEL 8.9
- Begin Installation: Select “Install Oracle Linux 8.9” and proceed with the guided setup.
- Partition Disks: To keep it simple, I just save 10 gb of disk for swap and put the rest under /
- Select Software Packages: Choose the Server only install option, or “Server with GUI” if you prefer.
- Configure Network: Activate the virtual network card.
Post-Installation Setup
- Update the System: Once the installation is complete, update the system using “yum update”
- Install Required Dependencies (this is a shortcut for many of the requirements for all 3 versions):
- yum -y install oracle-database-preinstall-19c-1.0-1.el9.x86_64
- perl.x86_64 – Needed for part of the 19c Java patch.
- Create initial directories and assign their ownership to oracle:oinstall
yum update
yum -y install oracle-database-preinstall-19c-1.0-1.el9.x86_64 perl.x86_64
mkdir -p /u01 /oracle
chown oracle:oinstall /u0* /oracle
Oracle 11.2.0.4 Install
11g will require these additional packages:
yum install -y gcc.x86_64 glibc glibc-devel
curl -o libaio-0.3.109-13.el7.i686.rpm https://yum.oracle.com/repo/OracleLinux/OL7/latest/x86_64/getPackage/libaio-0.3.109-13.el7.i686.rpm
curl -o libaio-0.3.109-13.el7.x86_64.rpm https://yum.oracle.com/repo/OracleLinux/OL7/latest/x86_64/getPackage/libaio-0.3.109-13.el7.x86_64.rpm
curl -o libaio-devel-0.3.109-13.el7.i686.rpm https://yum.oracle.com/repo/OracleLinux/OL7/latest/x86_64/getPackage/libaio-devel-0.3.109-13.el7.i686.rpm
curl -o libaio-devel-0.3.109-13.el7.x86_64.rpm https://yum.oracle.com/repo/OracleLinux/OL7/latest/x86_64/getPackage/libaio-devel-0.3.109-13.el7.x86_64.rpm
yum -y localinstall libaio-0.3.109-13.el7.i686.rpm
yum -y localinstall libaio-0.3.109-13.el7.x86_64.rpm
yum -y localinstall libaio-devel-0.3.109-13.el7.x86_64.rpm
yum -y localinstall libaio-devel-0.3.109-13.el7.i686.rpm
Now we install 11g.
Download installation software to /u01/inst, and unzip there.
cd /u01/inst
mkdir -p /u01/app/oracle/product/11
./runInstaller -silent -ignoreSysPrereqs -ignorePrereq -waitforcompletion -showProgress  \
FROM_LOCATION=/u01/inst/database/stage/products.xml \
oracle.install.option=INSTALL_DB_SWONLY \
UNIX_GROUP_NAME=oinstall \
INVENTORY_LOCATION=/u01/app/oraInventory \
ORACLE_HOME=/u01/app/oracle/product/11 \
ORACLE_HOME_NAME="OraDb11g_Home1" \
ORACLE_BASE=/u01/app/oracle \
oracle.install.db.InstallEdition=EE \
oracle.install.db.isCustomInstall=false \
oracle.install.db.DBA_GROUP=oinstall \
oracle.install.db.OPER_GROUP=oinstall \
DECLINE_SECURITY_UPDATES=true

Run the required root scripts mentioned at the end of the install.
Restore Database Directly to 11.2.0.4
Add an entry to your /etc/oratab for your database name.
echo "bob:/u01/app/oracle/product/11:N" >>/etc/oratab
.oraenv
Copy your backup files to a suitable location (I used /u02/backup).
Make some required directories (you may need to restore spfile first, to adjust locations or create the right places).
mkdir -p /oracle/admin/bob/adump/bob /oracle/oradata /oracle/oradata/BOB/controlfile /oracle/fra
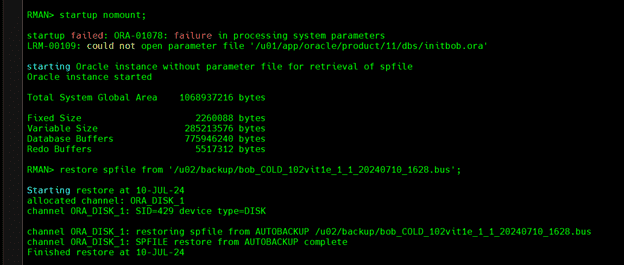
Restore from your rman backup.
rman target /
startup nomount;
restore spfile from '/u02/backup/bob_COLD_102vit1e_1_1_20240710_1628.bus';
shutdown immediate;
startup nomount;
restore controlfile from '/u02/backup/bob_CTRL_112vit27_1_1_20240710_1628.bus';

alter database mount;
CONFIGURE DEVICE TYPE DISK PARALLELISM 3  BACKUP TYPE TO BACKUPSET;
restore database;
recover database; - Here is where you could potentially do multiple rounds of recovery, if you're restoring from a large database backup.

Upgrade Database to 11.2.0.4
Now we open in upgrade mode and upgrade the system to 11.2.0.4.

sqlplus / as sysdba
alter database open resetlogs upgrade;
cd $ORACLE_HOME/rdbms/admin
sqlplus / as sysdba
spool /tmp/upgrade.log
set echo on
@catupgrd.sql
Then start the instance for the next step.
startup mount
ORACLE instance started.
Total System Global Area  626327552 bytes
Fixed Size                  2255832 bytes
Variable Size             335545384 bytes
Database Buffers          281018368 bytes
Redo Buffers                7507968 bytes
Database mounted.
alter database archivelog;
Database opened.

Install Oracle 19c
Create a path for 19c, unzip the database and install.
mkdir /u01/app/oracle/product/19
cd /u01/inst
unzip -q 19c_db_V982063-01.zip -d /u01/app/oracle/product/19
export ORACLE_HOME=/u01/app/oracle/product/19
export INST_DIR=/u01/inst
export ORACLE_BASE=/u01/app/oracle
export ORACLE_GROUP=oinstall
export EDITION=EE
export CV_ASSUME_DISTID=OEL8.5
cd $ORACLE_HOME
./runInstaller -waitforcompletion  \
oracle.install.option=INSTALL_DB_SWONLY\
ORACLE_HOSTNAME=${ORACLE_HOSTNAME} \
UNIX_GROUP_NAME=${ORACLE_GROUP} \
SELECTED_LANGUAGES=en \
ORACLE_HOME=${ORACLE_HOME} \
ORACLE_BASE=${ORACLE_BASE} \
oracle.install.db.InstallEdition=${EDITION} \
oracle.install.db.OSDBA_GROUP=${ORACLE_GROUP} \
oracle.install.db.OSBACKUPDBA_GROUP=${ORACLE_GROUP} \
oracle.install.db.OSDGDBA_GROUP=${ORACLE_GROUP} \
oracle.install.db.OSKMDBA_GROUP=${ORACLE_GROUP} \
oracle.install.db.OSRACDBA_GROUP=${ORACLE_GROUP} \
SECURITY_UPDATES_VIA_MYORACLESUPPORT=false \
DECLINE_SECURITY_UPDATES=true
bob:> sudo /u01/app/oracle/product/19/root.sh
Check /u01/app/oracle/product/19/install/root_ol8_2024-07-11_16-20-02-692938618.log for the output of root script.
Patch 19c Database to 19.23
- Download the required patches and patch the database.
- This also gives you a new version of the autoupgrade.jar file.
- You can use wget to download the patch files.
cd /u01/inst
wget --http-user="[email protected]" --http-password="password" --output-document="19.24-db-p36582781_190000_Linux-x86-64.zip" https://updates.oracle.com/Orion/Services/download/p36582781_190000_Linux-x86-64.zip?aru=25751445&patch_file=p36582781_190000_Linux-x86-64.zip
wget --http-user="[email protected]" --http-password="password" --output-document="p6880880_190000_Linux-x86-64.zip" "https://updates.oracle.com/Orion/Download/process_form/p6880880_190000_Linux-x86-64.zip?file_id=112014090&aru=25200703&[email protected]&[email protected]&patch_password=&patch_file=p6880880_190000_Linux-x86-64.zip"
Install the patches. Set the 19c environment for the patch and unzip the patches.
echo 19:/u01/app/oracle/product/19:N >> /etc/oratab
.oraenv, enter 19
unzip -q 19.23-db-p36233263_190000_Linux-x86-64.zip
unzip -q 19.23-jvm-p36199232_190000_Linux-x86-64.zip
unzip -oq p6880880_190000_Linux-x86-64.zip -d $ORACLE_HOME
$ORACLE_HOME/OPatch/opatch lspatches
29585399;OCW RELEASE UPDATE 19.3.0.0.0 (29585399)
29517242;Database Release Update : 19.3.0.0.190416 (29517242)
cd 36233263
$ORACLE_HOME/OPatch/opatch apply
cd ../36199232
$ORACLE_HOME/OPatch/opatch lspatches
36199232;OJVM RELEASE UPDATE: 19.23.0.0.240416 (36199232)
36233263;Database Release Update : 19.23.0.0.240416 (36233263)
29585399;OCW RELEASE UPDATE 19.3.0.0.0 (29585399)
Upgrade 11.2.0.4 to 19c
We use the autoupgrade utility to upgrade to 19c.Make some directories to hold the upgrade files.
- mkdir -p ~/upgrade ~/upgrade/global ~/upgrade/log
- cd ~/upgrade
Create a sample config file. Edit that config file with these values.
export NEW_ORACLE_HOME=/u01/app/oracle/product/19
$NEW_ORACLE_HOME/jdk/bin/java -jar $NEW_ORACLE_HOME/rdbms/admin/autoupgrade.jar -create_sample_file config  noncdbtopdb
mv sample_config.cfg config.cfg
global.autoupg_log_dir=/home/oracle/upgrade/global
upg1.log_dir=/home/oracle/upgrade/log
upg1.sid=bob
upg1.source_home=/u01/app/oracle/product/11
upg1.target_home=/u01/app/oracle/product/19
upg1.run_utlrp=yes
upg1.timezone_upg=yes
Run the autoupgrade using analyze mode to see if any manual changes are needed.
$NEW_ORACLE_HOME/jdk/bin/java -jar $NEW_ORACLE_HOME/rdbms/admin/autoupgrade.jar -config config.cfg -mode ANALYZE
Check log to confirm if passed checks.
cat /home/oracle/upgrade/global/cfgtoollogs/upgrade/auto/status/status.log
Deploy to upgrade.
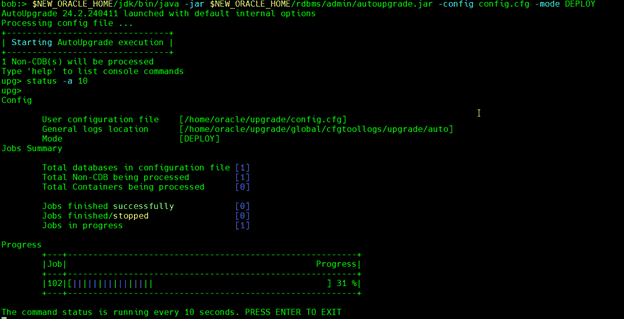
$NEW_ORACLE_HOME/jdk/bin/java -jar $NEW_ORACLE_HOME/rdbms/admin/autoupgrade.jar -config config.cfg -mode DEPLOY
You can use these commands to monitor the upgrade process.
- lsj
- tasks
- status -a 7
Install Oracle 23ai
Now we install 23ai.
This is currently the Free version available here. Or we can use wget again as root.
wget --no-check-certificate -c --header "Cookie: oraclelicense=accept-securebackup-cookie" https://download.oracle.com/otn-pub/otn_software/db-free/oracle-database-free-23ai-1.0-1.el8.x86_64.rpm
![]()
Run the pre-install and the rpm install as root.
yum -y install oracle-database-preinstall-23ai.x86_64
yum -y localinstall oracle-database-free-23ai-1.0-1.el8.x86_64.rpm --allowerasing
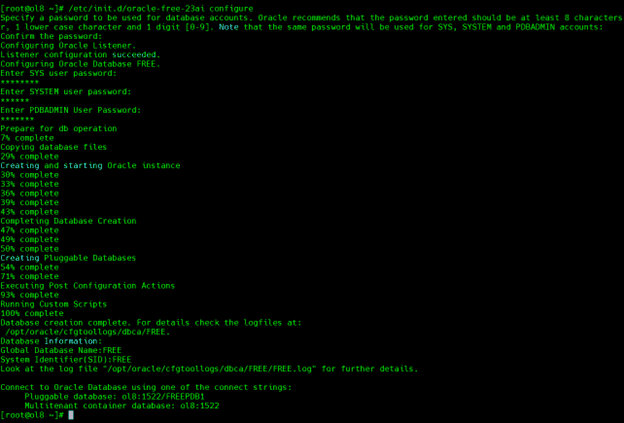
To keep thing simple, we setup the 23ai free database using default parameters. This will automatically create a CDB we can use for the 19c->23ai upgrade.
/etc/init.d/oracle-free-23ai configure

Upgrade 19c to 23ai PDB
Drop the restore point created in the prior upgrade.
drop restore point AUTOUPGRADE_9212_BOB112040;
Set compatibility to 19c and restart the instance.
alter system set compatible='19.0.0' scope=spfile;
shutdown immediate
startup
Re-run the prior steps for autoupgrade, this time using non cdb to pdb option.
export NEW_ORACLE_HOME=/opt/oracle/product/23ai/dbhomeFree
cd ~/upgrade
rm -rf global log
$NEW_ORACLE_HOME/jdk/bin/java -jar $NEW_ORACLE_HOME/rdbms/admin/autoupgrade.jar -create_sample_file config  noncdbtopdb
global.autoupg_log_dir=/home/oracle/upgrade/global
upg1.log_dir=/home/oracle/upgrade/log
upg1.sid=bob
upg1.source_home=/u01/app/oracle/product/19
upg1.target_home=/opt/oracle/product/23ai/dbhomeFree
upg1.run_utlrp=yes
upg1.timezone_upg=yes
upg1.target_pdb_name=bob
upg1.target_cdb=FREE
Run the same analyze and deploy steps as before.
$NEW_ORACLE_HOME/jdk/bin/java -jar $NEW_ORACLE_HOME/rdbms/admin/autoupgrade.jar -config config.cfg -mode ANALYZE
$NEW_ORACLE_HOME/jdk/bin/java -jar $NEW_ORACLE_HOME/rdbms/admin/autoupgrade.jar -config config.cfg -mode DEPLOY


Upgrading to Oracle 23ai and setting up a new OEL 8.9 server is a strategic move that can significantly enhance your system’s performance, security, and functionality. By following the outlined steps and taking advantage of the new features, you can ensure a smooth transition and position your organization to leverage the full potential of this powerful software.
Get expert help with your Oracle 23ai upgrade with our dedicated Oracle Database team.
Further information and other useful links:
